![]()
CommunityDocuments Server Control
Part of the Community Platform, this server control allows users to create and upload either individual user content to the user profile or group content to the group profile. The content can be HTML content or an asset, such as a PDF document or a .jpeg file.
The control displays a list of uploaded content filtered by category. In addition, a logged-in member can manage files, create categories, and decide which users can view the documents. This server control is typically placed on a user’s or a group profile page.
Note: When you drag and drop this control on a Web form in Visual Studio, the following message appears in the label of the control: “Workspace for user does not exist”. This happens because no ID is assigned to the control. Once you assign an ID, the control’s name and the ID are displayed. If you use the DynamicParameter property to dynamically pass an ID from the QueryString, the above message is displayed because an ID is not assigned to the control.
This section now divides into two major sections.
- Using the CommunityDocuments Server Control in an Individual User Profile
- Using the CommunityDocuments Server Control with a Group Profile
See Also: CommunityDocuments Server Control Properties
Using the CommunityDocuments Server Control in an Individual User Profile
Adding Folders
Users can add folders to their Workspace to help them organize items in the documents area. To add folders, follow these steps.
1. On the Web site, navigate to a User’s Profile Page > Workspace.
2. Click Manage Folder ( ).
).
3. The Add Folder box appears.
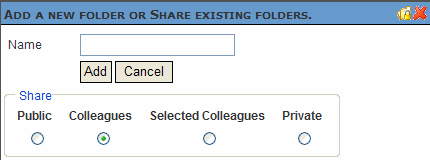
4. Enter a Name for the folder.
5. Determine with whom you want to share the folder's documents. For a description of the Share options, see Sharing Workspace Content.
6. Click Add.
7. The page refreshes and displays the newly added folder.

Editing a Folder Name
Sometimes, it is necessary to change the folder name. To accomplish this, follow these steps.
1. On the Web site, navigate to a User’s Profile Page > Workspace.
2. Click Edit ( ), located to the left of the folder’s title, as circled below.

3. The Edit Folder dialog appears.

4. Change the name of the folder.
5. Click Save.
6. The page refreshes and shows the folder's new name.

Deleting a Folder
A user can delete obsolete folders from his Workspace. To delete a folder, follow these steps.
Note: You can not delete the top-level folder, Workspace.
Warning! Deleting a folder permanently deletes all of the assets and HTML content in the folder, as well as its subfolders.
1. On the Web site, navigate to a User’s Profile Page > Workspace.
2. Click Edit (), located to the left of the folder’s title.
3. The Edit Folder dialog appears.
4. Click Delete.
5. A dialog box asks you to confirm.
6. Click OK.
Adding Assets to a Workspace
Assets are files that are not HTML content, such as Office documents and PDFs. To add an asset to a user’s Workspace, follow these steps.
1. On the Web site, navigate to a User’s Profile Page > Workspace.
2. Select a folder to which the asset will be added. If you want to create a new folder, see Adding Folders
3. Click Add Asset ( ).
).
4. The Add Asset box appears. Its appearance varies depending on your browser, etc. To learn about these variations, see Methods for Importing Documents.

5. Import one or more assets, depending on the screen.
6. A status box shows the files being uploaded.
7. The asset(s) appear in the file list.

Creating HTML Content
To create HTML content in your Workspace, follow these steps.
1. On the Web site, navigate to a User’s Profile Page > Workspace.
2. Select a folder where the content will be added. If you want to create a new folder, see Adding Folders
3. Click Add HTML Content ( ).
).
4. The Add HTML Content window appears. The editor page looks like this.

5. Add a title and content.
6. Click Publish to publish the content.
7. The HTML content appears in the file list.

Moving and Copying Content
You can move or copy assets and HTML content from one folder to another. To accomplish either action, follow these steps.
1. On the Web site, navigate to a User’s Profile Page > Workspace.
2. Select the folder from which to move or copy the content.
3. Click the drop down triangle to the right of the content title (circled below).

4. From the drop down list, select Copy.

5. Select the folder to which the content will be moved.
6. Click Manage.

7. Click Move Items ( ) or Copy (
 ).
).
8. A dialog box asks you to confirm.
9. Click OK.
10. The moved or copied content appears in the folder.
Sharing Workspace Content
The Workspace area allows users to share content with colleagues. Users can share content with the Public, Colleagues, Selected Colleagues or keep the content private.
Users apply sharing options to folders, not individual content items. To share a folder, follow these steps.
1. On the Web site, navigate to a user’s or community group's Profile Page > Workspace.
2. Locate the folder you want to share.
3. Click Manage Folder ().
4. The Add or Share Folder dialog box appears.
5. Click Share Folder ( ) in the top right corner.
6. The Share Folder dialog box appears.

7. Select with whom to share your folders. The table below describes each option.
|
Viewer Type |
People who can view your documents |
|
Public |
Everyone viewing your Workspace |
|
Colleagues |
Only colleagues See Also: Friends Server Control. |
|
Selected Colleagues |
Only selected colleagues See Also: Designating a Selected Colleague |
|
Private |
Only you |
8. Click Share.
Documents in the folder are now available for viewing by the selected viewer type.
Using the CommunityDocuments Server Control with a Group Profile
Adding Folders
Community group members can add folders to the Workspace to help organize items in the Documents area. To add folders, follow these steps.
1. On the Web site, navigate to a community group’s Profile Page > Workspace.
2. Click Manage Folder ().
3. The Add Folder dialog appears.

4. Enter a Name for the folder.
5. Determine with whom you want to share the folder's documents.
- Public - anyone can view and edit the document
- Private - only group members can view and edit the document
Note: If you want to later change a folder's share setting, follow the directions in Sharing Workspace Content.
6. Click Add.
7. The page refreshes and displays the newly added folder.
Editing a Folder Name
Sometimes, it is necessary to change the folder name. To accomplish this, follow these steps.
1. On the Web site, navigate to a community group Profile Page > Workspace.
2. Click Edit (), located to the left of the folder’s title, as circled below.
3. The Edit Folder dialog appears.
4. Change the name of the folder.
5. Click Save.
6. The page refreshes and shows the folder's new name.
Deleting a Folder
A user can delete obsolete folders from his Workspace. To delete a folder, follow these steps.
Note: You can not delete the top-level folder, Workspace.
Warning! Deleting a folder permanently deletes all of the assets and HTML content in the folder, as well as its subfolders.
1. On the Web site, navigate to a community group's Profile Page > Workspace.
2. Click Edit (), located to the left of the folder’s title.
3. The Edit Folder dialog appears.
4. Click Delete.
5. A dialog box asks you to confirm.
6. Click OK.
See Also: Adding Assets to a Workspace, Creating HTML Content, Moving and Copying Content, Sharing Workspace Content
CommunityDocuments Server Control Properties
The CommunityDocuments server control properties are described in this table.
Note: The following table only lists Ektron-specific properties. It does not describe native .NET properties such as font, height, width and border style. For documentation of these properties, see Visual Studio help.
|
Property |
Description |
Data Type |
|
Authenticated |
Indicates if you are logged in to the CMS Explorer and can use it to browse to Content, Collections, etc. See Also: Working with Ektron CMS400.NET Server Controls |
String |
|
CacheInterval |
Sets the amount of time the server control’s data is cached. The default is 0 (zero). This is the amount of time, in seconds, a control’s data is cached. For example, if you want to cache the data for five minutes, set this property to 300 (three hundred). See Also: Caching with Server Controls |
Double |
|
DefaultObjectID |
The default object ID for this control to use when there is no matching dynamic parameter value passed. |
Long |
|
DisplayXslt |
Determines how information is displayed on the page. Enter the path to the XSL file. It can be relative or absolute. Warning! : If you specify an external file, it is strongly recommended that you do not store this file your site’s Workarea folder. If you store this file in the Workarea folder, the file will be lost when you upgrade. Warning! If you enter a valid EkML file at the MarkupLanguage property, the DisplayXslt property value is ignored. |
String |
|
DoInitFill |
By default, Fill occurs during the Page_Init event. Set to false if you want to postpone the fill-action until later. In this case, FIll is automatically called during the Page Render event. You might do this if you need to set or change a property on the control in codebehind and have it render with your changes shown. |
Boolean |
|
DynamicContentBoxHeight |
The height of the dynamic content box in pixels |
Integer |
|
DynamicContentBoxWidth |
The Width of the dynamic content box in pixels |
Integer |
|
DynamicContentTemplate |
The template to use when displaying dynamic content. Leave blank to use the dynamic box. |
String |
|
DynamicParameter |
Gets or sets the QueryString parameter to read a object ID dynamically. To use the default object ID, leave blank. |
String |
|
EnablePaging |
This property, in conjunction with the MaxResults property, lets site visitors view an unlimited number of document items while controlling the amount of screen space. To accomplish this, the display is limited to the number set in the MaxResults property. If you set this property to true, and the number of items exceeds the MaxResults number, navigation aids appear below the last item. |
Boolean |
|
Hide |
Used to hide output of the control in design time and run time. True = Hide control False = Display control |
Boolean |
|
IncludeIcon |
Choose whether to display icons next to the navigation list’s links.
True = Show icons False = Hide icons |
Boolean |
|
ItemSortOrder |
Specify the sort order of results. Choices are: taxonomy_item_display_order - the order of taxonomy items as set in the Workarea. For additional information, see Change Order of Content Assigned to a Taxonomy/Category content_title - content ordered in alphabetical order by title date_created - content ordered in the chronological order by creation date last_edit_date - content ordered in the chronological order by last edit date. You can specify the direction of the items with the SortDirection property. |
|
|
Language |
Set a language for viewing the CommunityDocuments control. This property shows results in design-time (in Visual Studio) and at run-time (in a browser). |
Integer |
|
LinkTarget |
Determines the type of window that appears on this Web form when a user clicks an item in the dynamic content box. The default is _self. _Self - opens in same window _Top - opens in parent window _Blank - opens in new window _Parent - opens in the parent frame |
String |
|
MarkupLanguage |
Identify the template markup file that controls the display of the server control. For example, mymarkup.ekml. If the *.ekml file is located in the same folder as the Web form containing the server control, just enter its name. Otherwise, the path to the file can be relative or absolute. See Also: Controlling Output with Ektron Markup Language |
String |
|
MaxResults |
The maximum number of items to display in the control. 0 (zero) = unlimited. |
Integer |
|
ObjectType |
The type of object to which this control is assigned. Choices are: User - this control is assigned to an individual. Group - this control is assigned to a community group. |
CommunityDocuments |
|
ShowCount |
Determines if an integer representing the number of items in a category appears next to the category. The default is False.
True - Show items number next to category False - Do not show items number next to category |
Boolean |
|
SortDirection |
Select the direction of the itemSortOrder property. Choose Ascending or Descending. |
String |
|
Stylesheet |
Specify the path to a style sheet for use with the Documents server control. The location can be relative or absolute. Leave blank to use the default style sheet. Warning! If you enter a valid EkML file at the MarkupLanguage property, the Stylesheet property is ignored. |
String |
|
TaxonomyCols |
Enter the number of columns in which this taxonomy/category appear on the page. |
Integer |
|
TaxonomyItemCols |
Enter the number of columns in which the taxonomy item appears on the page. |
Integer |
|
WrapTag |
Allows a developer to specify a server control’s tag. The default is Span. Span - The <span> tag is used to designate an inline portion of an HTML document as a span element. Div - The <div> tag is used when you want to apply attributes to a block of code. Custom - Allows you to use a custom tag. |
String |


![]()